How can small businesses leverage modern technology to boost productivity and market reach?
I started investigating this question a couple months ago. One of the trends that came up consistently in my research was the use of large language models (LLMs) and “workflow automation tools” to automate critical business tasks. Here’s a list of some use cases taken straight from the landing page for one of the most popular automation products, Zapier:
- Sales handoffs
- Marketing campagins
- Data management
- IT helpdesk
- Lead Management
- Revops
Even with no programming experience, people are able to build amazingly sophisticated and useful software systems that have a positive impact on their business’s bottom line.
Over the course of my career, I’ve used many different software products. Not one has helped me with a business task. This started sounding pretty appealing. I want to spend my time doing what I get paid to do - engineering. If these tools can help me codify and reduce the time I spend on some business process, then it’s worth giving them a try.
What I’ll Cover
In this post I’m going to
- describe what workflow automation is,
- discuss why “no-code” platforms may not be the right choice,
- introduce a powerful new open source alternative called Trigger.dev
After that, I’ll describe how I used Trigger.dev, Google Sheets, and an LLM to build a proof-of-concept career advice system.
Introduction to Workflow Automation
Workflow automation tools empower you build software systems by combining third-party APIs. The most popular ones, like
require little to no programming. Instead, you design workflows visually by dropping blocks onto a canvas and connecting them together. Like this:
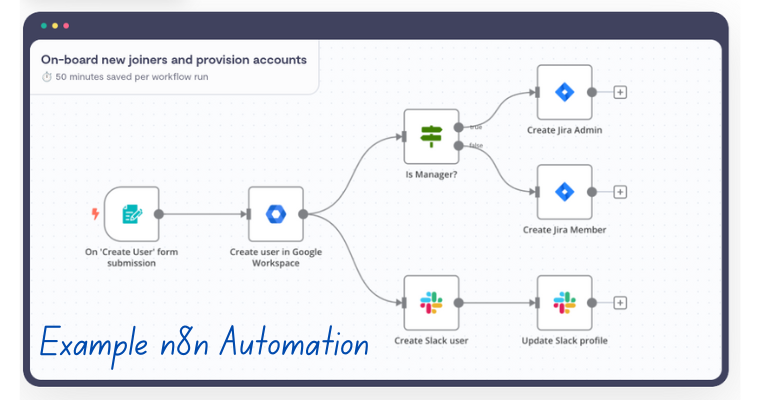
Some of the blocks implement simple programming constructs like boolean logic or iteration. Others, usually called “integrations”, communicate with APIs. To use an integration, you just need to plug in your API credentials.
Obviously this is great for someone with a product idea but doesn’t have the development experience to build it. But it can also be a productivity adder for experienced programmers. Working through API documentation might be interesting for awhile. But at some point, your time is probably better spent doing something else. These tools can give you some of your time back.
Experimenting with Make
In Make, workflows are called “scenarios”. For my first foray into automation, I built a simple scenario that used an OpenAI assitant to convert old written content into short blog post drafts, and emailed them on for review. Everything was managed through a single Google Sheet. Here’s what the scenario looked like in the Make dashboard:
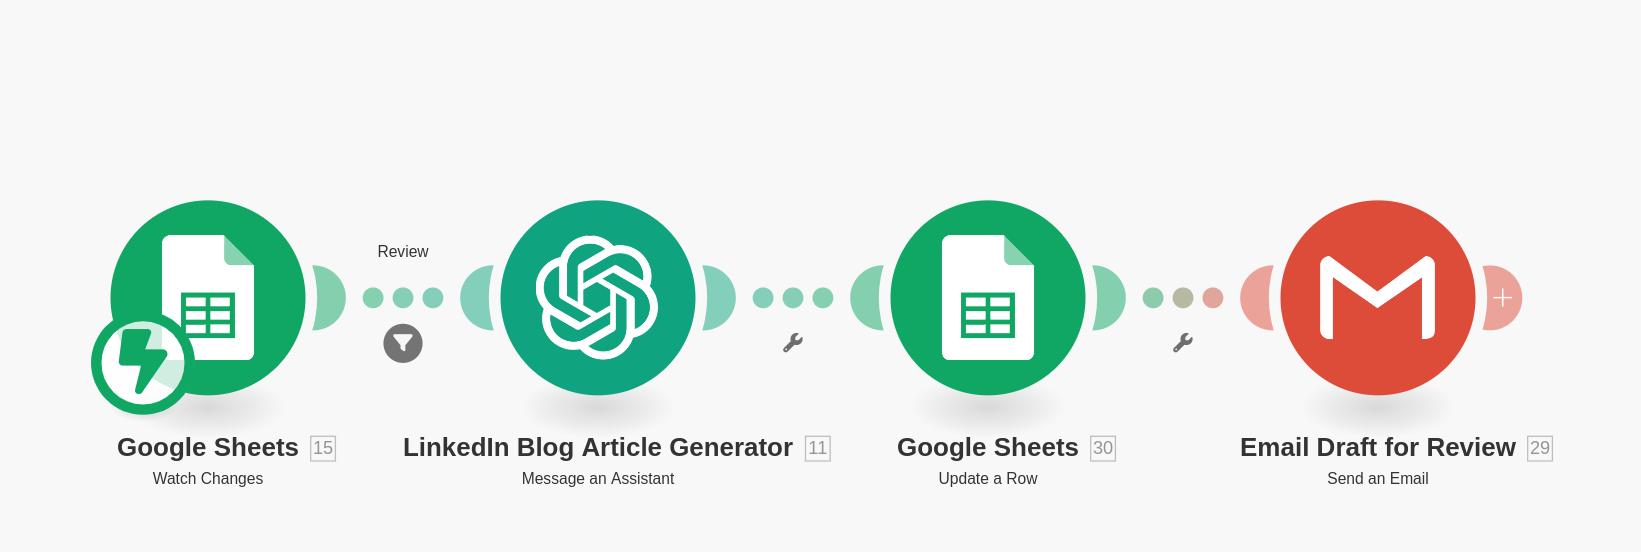
Implementing this was very easy. The most tedious part was setting up my Google credentials. Even that wasn’t hard, just unfamiliar. You end up having to access your Google Cloud account, which I hadn’t done before.
Why No-Code is not my Ideal Choice
I have nothing bad to say about Make. It’s a fantastic service, it’s just not the right tool for me. I prefer programming over working a user interface, no matter how great it is. Programming takes more work, but in return you get more power, more flexibility, and more independence.
This last point is particulary important to me. As an electrical engineer, it’s very easy to become a victim of “vendor lock-in”. Adopting software tools is unavoidable, but you don’t want to become so dependent on them that you forget the fundamentals. If you can afford the time, it’s best to strive for a first-principles approach as much as possible. Then you can jump around and use whatever tool you want.
Make simply doesn’t conform to my first-principles philosophy, so I started looking into alternatives. I was planning on giving n8n a try, but then I came across Trigger.dev.
Introduction to Trigger
Trigger is much different than other popular automation solutions.
- Instead of connecting blocks on a canvas, workflows are expressed in Javascript and/or Typescript code.
- Integrations aren’t included. To communicate with APIs, you need to add the appropriate dependencies and write the code yourself.
If you aren’t getting drag-and-drop functionality, and you’re aren’t getting built-in integrations, what are you getting?
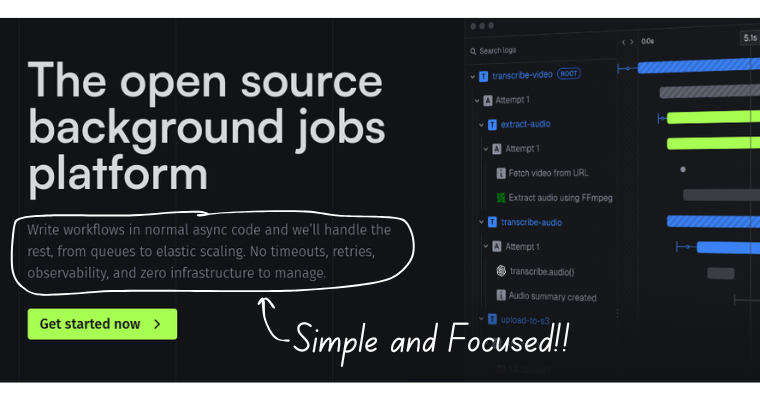
Like their website says, you’re getting an optimized deployment experience where you
“Write workflows in normal async code and we’ll handle the rest …”
They’ve figured out a cost-effective way to package and execute long running tasks on the web, without worrying about timeouts. Time-consuming calculations, multiple API calls, long-delays, and complex scheduling can all be expressed in a single serverless function. This opens up all sorts of possibilities that would be extremely tricky to implement with other serverless computing options. No Function as a Service (FaaS) that I know of, will successfully run after 15 minutes. Here’s a list of popular options with their run-time limits:
- DigitalOcean Function: 15 minutes
- Supabase Edge Functions: 150s-400s
- Vercel Functions: 15 minutes
- AWS Lambda Functions: 15 minutes
There are cetainly systems you might want to design that could take longer than 15 minutes. For example, you might want to schedule a workflow to execute every day at 8:45am. You can do this with the other serverless function providers, but you’re forced to either add the schedule to a database or a configuration file. You can’t express it directly in your function’s source code. With Trigger you can!
To get around the timeout constraint, you might be forced to distribute the work you’d like to do in one serverless function, over several. Now you’ll probably have to bring in a task queue, or some other way to manage state between function calls. This introduces a lot of complexity that you may not have the time, or expertise, to deal with. Trigger.dev handles all the extra complexity for you!
What I Built
I built a proof-of-concept system that offers career advice to students based on information stored in a Google Sheet. The code, minus the Google Sheet, can be found on my GitHub.

You start by putting the student’s name, age, and skills/interests in an open row. When you’re ready to get career advice for a student, change the “Trigger” dropdown from “Waiting” to “Get Jobs”. A few seconds later, you’ll get a list of carrer paths that leverage those skills.
There are many ways to make this system more powerful and visually appealing. I’ll continue working on it. For now, my main objective was building something functional.
System Architecture
If I used Make for this workflow, I’d only need to set up credentials, install the “Make for Google Sheets” extension, and drag in couple of integrations. Easy-peasy!
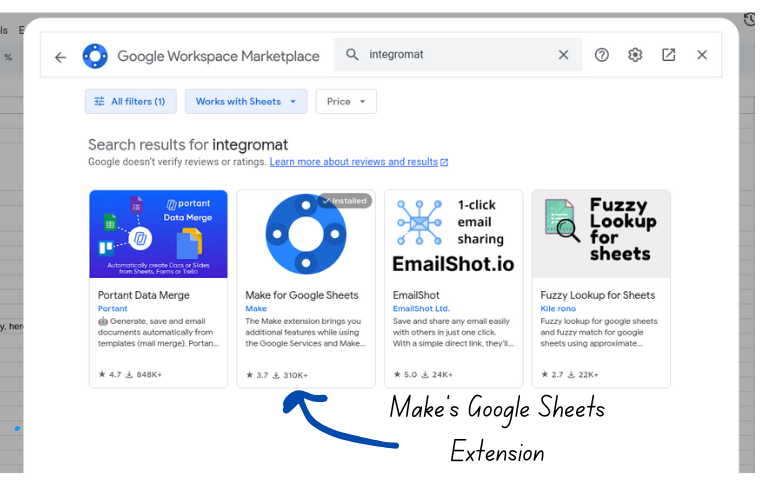
With Trigger, I needed to figure out a lot of the details myself:
- how to trigger an event from a Google Sheet
- how to send data from a Google Sheet to an API
- how to interact with the OpenAI API
- how to programatically update a Google Sheet with an API
Here’s what I came up with:
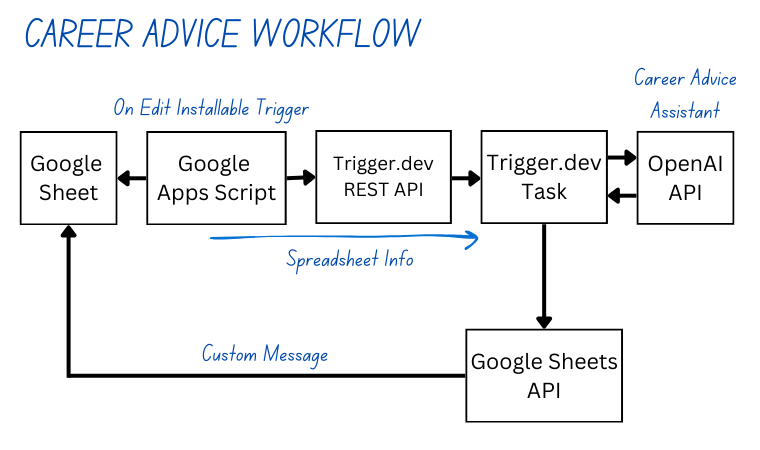
The spreadsheet uses 3 separate sheets:
- Students Sheet: Includes student details like name, age, skills and interests. The skills and interest will make up LLMs user prompt.
- Prompts Sheet: Contains system prompts that instruct the LLM how to behave and what to produce when given a user prompt. By including the prompt in the spreadheet, and not hardcoding it in the API call, I’ll be able to rapidly tweak and test variations.
- Models Sheet: Contains a list of open and closed source LLMs available from companies like OpenAI, Together.ai, and Groq . Right now, I’m exclusively using OpenAI’s inexpensive
gpt-4o-mini. But I can imagine wanting to see how different models perform.
When the state of the student’s dropdown changes from “Waiting” to “Get Jobs”, a Google Apps Script triggers. The script packages up information about the student and the sheets, including
- Sheet ID
- Sheet name
- Target cell that I want the career advice to go
- Student’s name
- Student’s skills and interests
- System prompt
- Name of the LLM model
and posts it to Trigger’s API. When the main task receives the packet, the work gets divided into two subtasks:
- OpenAI task: queries the LLM for career advice
- Google Sheets task: posts the career advice back to the originating Google Sheet
More details, including some of the source code, will be shown later.
Setting up API Credentials
Credentials need to be created for every service your automation needs. For me that means OpenAI and Google. This is probably the least exciting part of this post, but if you want your system to work, you’ve got to grind through it anyway.
I was thinking about sprinkling in screenshots to help with the instructions, but obviously didn’t. However, if you follow the procedure step-by-step, you should be in good shape.
OpenAI
Getting an OpenAI API Key is extremely simple:
- Sign into your account.
- Click the “API Keys” tab on the left side of your dashboard
- Press the “Create new secret key” button.
- Give the API Key a name, permissions, and connect it to a project. If you don’t have a project, like me, the default project is fine.
- Copy the API key and keep in somewhere safe. You won’t be able to get access to it again, though you can always create a new one.
Google Service Account
Setting up Google credentials is a long, annoying process. First thing you need to do is create a Goolge Cloud Platform project.
- Sign into Google Cloud Platform with your Google account.
- Create a project.
- Navigate to the API Library page and enable the Google Sheets API. You can get to this page by clicking the main navigation menu at the upper left of the page and selecting “APIs and Services”. Press the “Enable APIs and Services” button along the top of the page.
Now you need to create the user managed service account. Service accounts execute actions, like API requests, on your behalf.
- Get back to the APIs and Services Tab.
- Select the Credentials tab along the left hand side.
- Click the “Manage service accounts” link above above the “Service Accounts” listing.
- Press the “Create Service Account” button toward the top of the Service Accounts window.
- Give the service account a name and an ID. Press the “Create and Continue” button.
- Select the “Editor” role for this project. Press the “Continue” button.
- You don’t need to grant users access to the account. Press the “Done” button.
The previous step should bring you to a list of all your user managed service accounts. If this is your first time going through this process, you shouldn’t see any. Now you need to generate the credentials.
- Click the email for the service account created for you.
- Select the “Keys” tab along the top of the service account page.
- Press the “Add Key” drop down.
- Select the JSON option.
This generates your JSON web token (JWT) and downloads it to your computer. Put it in a safe place, you’ll need to use it later. You won’t be able to get a copy of this file again, but you can always generate a fresh one. Feel free to open it up and take a look, just don’t let anybody else see it. In addition to some basic information about your service account, including its email address, it has your private authorization key.
The final thing you need to do is share your Google Sheet with the service account’s email address. Go to your Google Sheet, press the “Share” button in the top right, and enter the email address for your service account.

Getting Started with Google Apps Script
Google Apps Scripts let you interact with Google Workspace products, like Google Sheets and Google Documents, in Javascript. To attach one to a Google Sheet, open up a Google Sheet, click the “Extensions” Tab in the top toolbar, and select “Apps Script”. This opens up an editor that lets you implement and test your so-called container-bound script, setup triggers, and add credentials.
I needed to write a Google Apps Script that
- gets information about the sheet including cell values and sheet names, and
- sends the information to the Trigger API
whenever the “Trigger” column transitions to “Get Jobs”. Because the Trigger API requires an authorization header, I used an “installable trigger”. With an installable trigger you manually attach an event to the function you want to run, when that event occurs. It’s just like a callback.
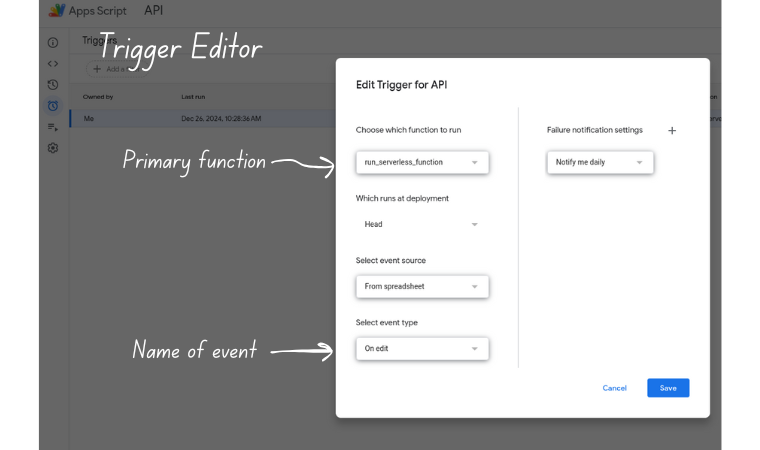
The “On Edit” event is the right choice for this application. I added some extra logic To avoid hitting the API when irrelevant cells were modified.
I also needed a way to store my Trigger credentials in the Apps Script project without revealing them in the source code. One of the recommended approaches is adding them to the Script Properties key-value datastore. Once stored, the credentials are accessible in the Apps Script through the PropertiesService class.
Creating a Trigger Project
Start by setting up a free Trigger account. Unless you’re planning on doing something really ambitious, you probably won’t need one of the paid tiers right away. You’re given the equivalent of $5 worth of task executions per month. It’s extremely generous. I’ve done a lot of testing and haven’t gotten anywhere close to spending 10 cents.
Creating an Organization and Project
To keep the dashboard reasonably well-structured, tasks get grouped into Organizations and Projects. I created an organization called “Career Assistant” and a project called “google-sheets-workflow”. With that out of the way, I was able to developing my Trigger codebase.
Initializing the Codebase
First, I initialized an npm package and added the OpenAI API and Google APIs Client as dependencies:
mkdir my-trigger-project
cd my-trigger-project
npm init -y
npm install openai googleapis
Once the dependencies were installed, I added Trigger by running the CLI initialization command:
npx trigger.dev@latest init
No need to install their CLI tool - npx handles everything for you.
This starts up a dialog that helps scaffold out a project:
Asks you which Trigger project you want to attach your tasks to.
Installs the Trigger SDK and any dependencies.
[Optional] Creates
src/triggerdirectory with a sample task.Creates a
trigger.config.tsconfiguration file.
The configuration file contains the autogenerated project ID for the project and organization just set up. It also defines some default behavior for tasks in the project related to failure handling and runtime.
Adding Credentials
Each project has its set of environment variables to store API credentials and other sensitive data you don’t want to reveal in source code. You add them under the “Environment variables” tab as key/value pairs. They’re accessed in your source code like environment variables in any other Node project, with process.env.
I added my OpenAI API key and my Google Service Account JWT.
It wasn’t immediately obvious how to store the JWT. After all, it’s a file, not an ID. Fortunately, Trigger’s website has a straight forward solution. They recommend base64 encoding the JWT, and storing that as your Google credential. Here’s what that looks like in bash (assuming the JWT is called google-jwt.json):
base64 google-jwt.json -w 0
The -w 0 disables line wrapping.
You’ll want to convert the base64 encoded string back to a Javascript object in your task code:
const jwt = JSON.parse(
  Buffer.from(process.env["GOOGLE_CREDENTIALS_BASE64"], "base64").toString("utf8")
);
and pass the object into the function that authorizes your service account to edit Google Sheets:
const googleAuth = new google.auth.GoogleAuth({
  credentials: jwt,
  scopes: ["https://www.googleapis.com/auth/spreadsheets"],
});
Organizing Tasks
My workflow was simple enough that I could have implemented the whole thing in a single task. To make testing a little bit easier, I decided to split it up into one root task and two subtasks - one per API. Even though this could theoretically bump up my usage bill (because I’ll be using more tasks), I’ll still be nowhere near exceeding the Free tier’s $5 monthly allowance.
Here’s the “root” task code that invokes my openai_task and google_sheets_task:
export const career_advice_task = task({
  id: "career-advice",

  run: async function (payload: any, { ctx }) {

    // Just Grab the response
    let chatResponse = await openai_task.triggerAndWait( payload ).unwrap();

    let googleResponse = await google_sheets_task.triggerAndWait({
      ...payload,
      chatResponse
    })

    logger.info("response from Google Sheets Task", googleResponse);

    return {
      message: "Done With Career Advice"
    }
  }
});
Calling triggerAndWait is the recommended way to call a task when you want to pass the output to another task. It starts the task, waits until it finishes, and returns a result object containing the task output, the completed run ID, the task ID, that a status flag indicating whether the run was successful or not. Here’s an example from my Trigger log for the Google Sheets task:
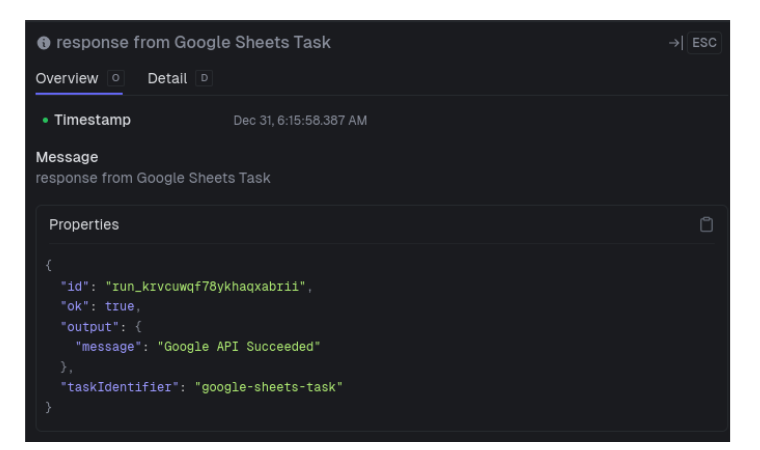
The unwrap method strips out the output value from the result object and throws the metadata away.
The subtasks are equally straight forward. Here’s the Google Sheets task with the base64 decoding.
const jwt = JSON.parse(
  Buffer.from(process.env["GOOGLE_CREDENTIALS_BASE64"], "base64").toString("utf8")
);

const googleAuth = new google.auth.GoogleAuth({
  credentials: jwt,
  scopes: ["https://www.googleapis.com/auth/spreadsheets"],
});


export const google_sheets_task = task({
  id: "google-sheets-task",

  run: async function({sheetId, sheetName, targetCell, studentName, chatResponse }: any) {

    const googleClient = await googleAuth.getClient();

    const sheets = google.sheets({version: "v4", auth: googleClient});

    let result = await sheets.spreadsheets.values.update({
      spreadsheetId: sheetId,
      auth: googleClient,
      range: `${sheetName}!${targetCell}`,
      resource: {
        values: [[`Hi ${studentName}, here are some careers to look into: ${chatResponse}`]]
      },
      valueInputOption: "USER_ENTERED"
    });

    logger.info("Inside Google Sheets Task", result);

    if (result?.status !== 200) {
      throw new Error("Google API Failed");
    }
    return {
      message: "Google API Succeeded"
    };

  }
});
and the OpenAI task
/*
  OPEN AI TASK
*/
const openai = new OpenAI({
  apiKey: process.env["OPENAI_API_KEY"], // This is the default and can be omitted
});

export const openai_task = task({
  id: "openai-task",

  run: async function({systemPrompt, userPrompt, model}: any) {
    const chatCompletion = await openai.chat.completions.create({
      messages: [
        { role: "system", content: systemPrompt},
        { role: "user", content: userPrompt }
      ],
      model: model,
    });

    logger.info("Chat completion", chatCompletion);
    // Deal with Error Case too .
    const chatResponse = chatCompletion?.choices[0].message.content;

    logger.log("Chat Completion", { chatResponse });

    if ( chatResponse === undefined ) {
      throw new Error("OpenAI failed answer request!");
    }
    return chatResponse ;
  }
});
For simplicity, I’m honestly thinking of getting rid of the API-specific libraries and just using Node’s built in fetch API. Besides reducing the number of dependencies (always a good thing if you can manage it), it will also make my code more flexible. Like I said earlier, I’d eventually like to use LLMs from organizations other than OpenAI. While many of them offer OpenAI-compliant APIs, I don’t want to necessarily rely on that continuing indefinitely.
When I squint, Trigger tasks remind me of frontend Javascript in a framework like Vue.js. The code is organized, gives you control over the object’s lifecycle (yes - tasks do indeed have several lifecycle methods: run, onStart, init, onSuccess, onFailure), and takes care of complicated drudgery in the background.
Deployment
The Free tier offers Development (Dev) and Production (Prod) environments. If you upgrade to a paid tier, you get a Staging environment. Dev lets you build and run your tasks locally before deploying them to hosted infrasturcture. It can come in handy, but I went straight for production. It’s easy. Go to the directory with the trigger.config.ts file and type
npx trigger.dev@latest deploy
After a few minutes, you’ll see your deployed tasks in the Dashboard. From there, you can test each task individually with custom JSON payloads:
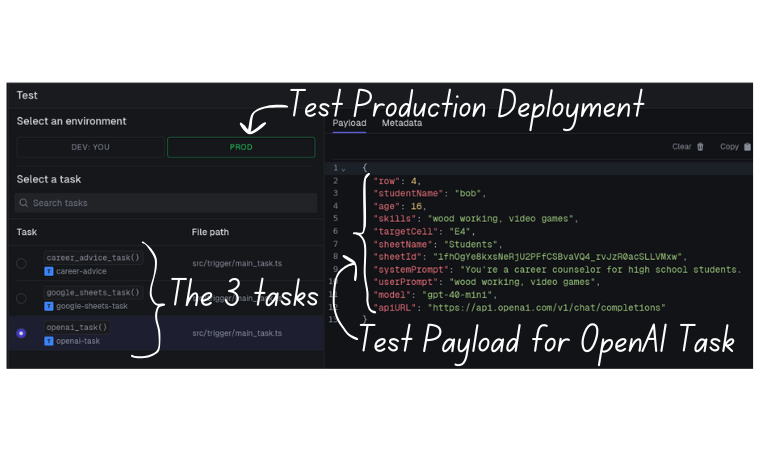
If you find a bug, no big deal. Just fix it and redeploy.
Finishing Up
The last thing I had to do was put my Trigger credentials in my Apps Script project’s Script Properties. This was simply a matter of going to the “API Keys” page in the Trigger dashboard, copying the production credentials, and pasting them in Script Properties.

Then it’s just a matter of hitting the API route for the root task, from the Apps Script code:
- Build the payload
const payload = {
    payload: {
        row:  activeRow,
        studentName: vals[0],
        age:  vals[1],
        skills:  vals[2],
        targetCell: targetCell,
        sheetName: studentSheetName,
        sheetId: sheetId,
        systemPrompt: systemPrompt,
        userPrompt: vals[2],
        model: model,
        apiURL: apiURL
    }
};
The object posted to the API can include different configuration options, context information, and a payload intended for the root task. I only needed the payload.
- Build the options object
const options = {
    method: 'POST',
    contentType: 'application/json',
    payload: JSON.stringify(payload),
    headers: {
        "Authorization": `Bearer ${getScriptSecret("TRIGGER_SECRET_KEY")}`
    }
};
This is the same sort of code you’d write with a normal Javascript fetch request.
- Make the request synchronously
const obj = UrlFetchApp.fetch(
    `https://api.trigger.dev/api/v1/tasks/${getScriptSecret("TRIGGER_ROOT_TASK_NAME")}/trigger`,
    options
);
As far as I know, Apps Scripts can’t make non-blocking requests, and there are limitations on how long this blocking fetch function call can take. Fortunately,
the Trigger API responds right away with the run ID after a few seconds.
Conclusion
With the technology available today, anyone, regardless of technical expertise, can build incredibly powerful software systems. All that’s needed is a motivating problem, and the willingness to learn.
I learned a lot about workflow automation, Javascript, and interacting with LLMs while preparing this article. Hopefully you got something out of it too. Trigger.dev is an amazingly simple, power, and flexible platform. They’re really onto something. Give it a try!